UV LED Spotlights are becoming more and more popular as a means to
light up props or small areas in your haunt. They provide a bright
light that will light up whatever it's pointed to, and not the rest of
the area. Not only are they inexpensive to purchase and operate (able
to run on a 9 volt battery), but they're also easy to work with.
In this how-to, we're going to show you how to make LED spotlights that
look like vines and foliage. Not only is this practical, but if used
right, your guests will never even know the difference between what's
"scenery" and what's "lighting".
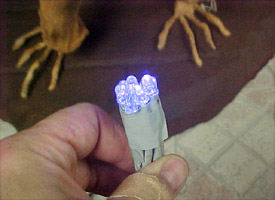
The first thing you want to do is bundle the lights together. Gather
around 8-10 LED lights and wire them up, each light with its own
resistor, then connect them to a common power suppy( 9 volt battery).
Once you have them wired up and working, you'll want to bundle them
together using electrical tape. Try to get the lights as even as you
can. You may also want to use electrical tape (or shrink tubing) to
keep the wires together and not end up all tangled. Always be careful
around other
people. Even though UV LED lights have been
proven to be safe in most cases, there is still the ultraviolet factor to consider and always better to be safe than sorry.
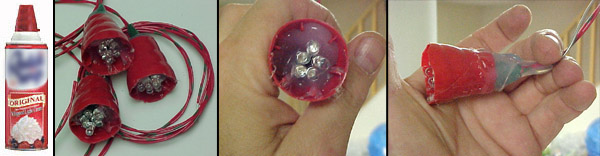
Now we've got the basic light done, you'll want to make a "case" to go
around the lights, to both protect and hide them. To do this, we'll use
the lid from a can of spray whipped cream. You'll want to take the lid
and cut the top off to fit over the bundle of lights. Next, use a hot
glue gun to fix the top of the cap to the wires on the light. Now, to
fix the lights even more to the cap, hot glue around the lights inside
the cap. Be careful not to get glue over the actual lights though, as
this may hinder it's effectiveness. Before we move on and start making
this thing look like a vine, you may wish to add some flexible wire
along the length of the UV electrical wire, to make your light
"poseable" (you can use 16 gauge galvanized wire for this).
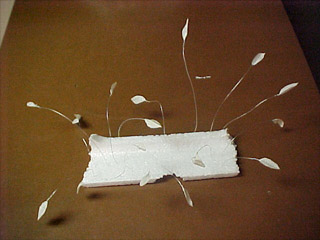
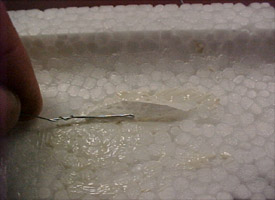
We'll start with the leaves first. You'll need to take a napkin or
paper towel and fold it a couple times. Then draw several half leaf
shapes, on the folded edge of the napkin. Once you have your leaf
shapes drawn on the edges, cut them out, as shown in the picture to the
right. This will produce many leaves with a natural looking crease in
the middle.
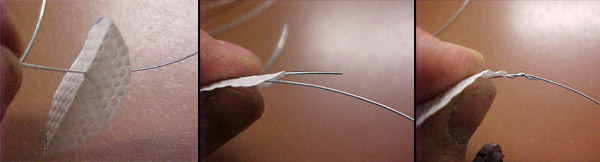
After your leaves are cut out, you'll want to make stems to attach them
to. I cut a piece of galvanized wire about 6 inches long, then took the
wire and
pushed
it through the center of a leaf. I ran enough wire through the leaf so
that I was able to bend it back and wrap it around itself to make a
stem. You'll want to wrap the excess wire around itself a few times to
prevent any sharp points that could potentially hurt somebody.
Next you'll want to brush latex on the leaves. I use a piece of
styrofoam as a guide, so that the wire remains straight while I brush
the latex on the leaf. Notice the type brush I use to paint the latex.
( I get them from Harbor Freight.) After I finish using it I wipe it
off with a paper towel and put it in a cup of water. The water keeps
the latex from drying so I could use the brush again. I just wipe it
off before I use it. Once you start coating the leaves with latex,
you'll want to let them dry somewhere. I suggest using another piece of
styrofoam to stand
the leaves
up in. Simply stick the end of the wire into the foam to hold it in place.
after
the one side of the leaves dried, I added latex to the other side.
After the other side is dried, I give each leaf one more coat of latex.
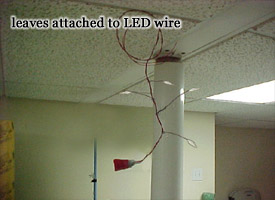
Once your leaves are done drying, it's time to begin assembly on the of
the vine structure. You'll want to wrap each end of the galvanized wire
with the leaf on it around the main LED wires.Be sure to wrap the end
of the galvanized wire tight and wrap it around several times to help
keep it in place. The LED wires will be your main stem and the stems
attached to your leaves will "branch out". Make sure you place them
at random spots along the main wire, to give it a realistic look.
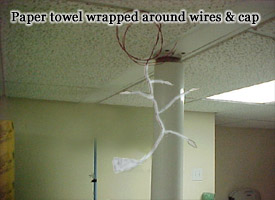
We're almost done! The next step will require paper towels and latex,
but before we go any further, there are 2 ways you can use the latex.
The first way is applying the latex to the paper towels and then
painting the entire 'vine' once it's dry, or you can skip that step and
mix in some acrylic paint with your latex. Once you've decided which
route you're going to go with the latex, wrap all of the wires, or
"stems", as well as the plastic cap, with paper towel. to coat all of
the wires, or "stems" with paper towel. You may need to wrap the towel
around each wire
several
times until the stem is at the desired thickness. On the stems, once
you have it to your liking, apply your latex directly to the paper
towel, covering any seams. Once this dries it will serve two purposes:
to make the entire project a little more durable and to keep the paper
towel from unravelling. Getting the towel around the plastic cap may
prove to be a bit tricky. You'll want to get the paper towel all the
way over to the lights. In order to help keep the towel in place, you
may want to add a dab of hot glue to the existing glue around the
lights, then press the towel into the glue.
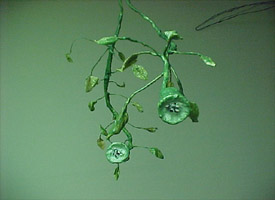
Add a few layers of latex to give it all a uniform look, then either
paint it or add some highlights to the already-green latex and you
should have something similar to the picture on the right.
This is a
cost-effective project that adds depth to LED spotlights and makes them
easier to hide in your scenes. You may wish to make your leaves
different shapes and studying photos of real vines can help you along
the way with both shapes, patterns and colors as you build your own
"vines".
Frank
Mollica is an amateur home haunter who has been haunting his house and
hosting Halloween parties for the past 5 years. He lives in Brooklyn
New York and can be reached at born2haunt@aol.com. To see more props and how-to's, visit his website at Born2haunt.com.