Building A Graveyard Tamara Hedstrom a.k.a. Keeba, shows you how you can create
the most realistic tombstones for the least amount of money
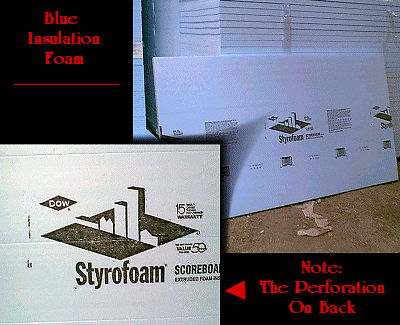
All the tombstones are made from "blue foam", which is a ceiling
insulation foam, also used when pouring foundations. Watch building
sites--they normally tear the foam off in large chunks and throw it
away. It comes in various thicknesses--I use 2 inch for most work, and
1/4" for odds and ends. This blue foam comes in huge sheets with two
perforations--so it can be "snapped" into three long sections. Have
your lumber person cut the foam against the perforation twice, then you
can snap three sections from that. You can make nine 16" x 32"
tombstones from a sheet (less, if you make a "bottom" piece) or six 32"
x 24" stones.
Draw out the basic shape of the stone. I've created a few templates to download . They are relatively tombstone sized, for printing out. You may wish to enlarge them slightly to fit your needs.
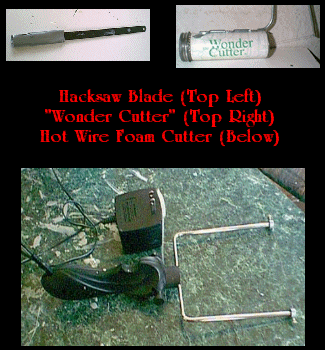
Cut out the shape. I've used use a hacksaw blade with a cloth wrapped
around one end or a "Wonder Cutter", available at most craft stores for
under $10.00.
As I make alot of tombstones, I invested in a Hot Wire Foam Cutter
from Woodland Scenics (model number ST1435 $34.98). Yes, they also have nichrome replacement
wire (ST1436 $1.98). It's electric, so no more expensive D batteries
and it has a wider cutting wire.
With a 12" long 1/4" drill bit, drill two holes up from the
bottom. This is where you will insert the metal posts that hold them in
the ground. I do this first, as there's nothing more disappointing than
spending alot of time creating a really nice looking stone--only to
accidentally drill through the front of it.
You can create your epitaphs on your computer--I use fonts like
Olde English , Caslon Antique, Caslon Antique Italic , or Abaddon .
Simply enlarge the epitaph, print it out and trace the lettering or
design on your tombstone. You can try carbon paper if you
want--personally it's never worked well enough to seem worthwhile to
me. I just use a ballpoint pen and press hard. It leaves enough of an
imprint to work from. Afterwards I go over the imprint with a pen. I
have heard of some who tape the epitaph onto the stone and actually
burn through the paper, but I have never had much success with that.
When I tried it, the paper smouldered a little bit after lifting the
burning tool which melted the foam more than I wanted and ruined
smaller lettering. Myself, I consider the time tracing the design onto
the stone to be worth it.
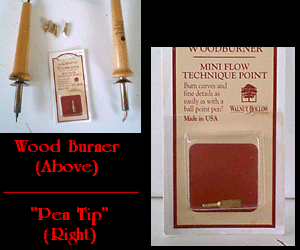
Carefully use a children's temperature woodburning tool
to "engrave" it. I use the smallest tip possible, a "pen tip", as the
foam melts very quickly. For raised lettering, recess the background
using a flat tip or a pen tip, if you prefer the look. If you need a
precise corner or you are trying to engrave very small lettering, go
over the lettering first with an Xacto knife. The cut slows the heat
from travelling further.
Another trick is to let the woodburner cool a bit when you attempt smaller letters and designs. A great way to control the heat of your burning tool is to use a lamp dimmer.
I use a swag lamp dimmer I purchased at Lowes for about $10.00. You can
lower the temperature of your burner and do much smaller lettering.
Please do this in a ventilated area! While I have been assured
that this foam is not poisonous, that does not mean it isn't toxic. For
all I know, I was alot smarter before I started doing this. Could be
the explanation as to why I can never remember names to faces...
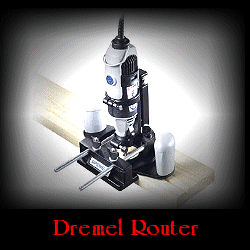
I recently had a chance to use a Dremel router, which makes a beautifully flat recessed area! One warning--it
also makes alot of foam dust. You will want to wear eye protection, old
clothes, even something over your hair. You may also want to keep a
vacuum handy.
Worn edges can be made by carving the edges down with an Xacto knife or
by using sandpaper. I use a foam sanding block I picked up from Walmart
for about a dollar. Nicks and chips from the foam make the stone look
all the older so I generally leave them in and paint appropriately.
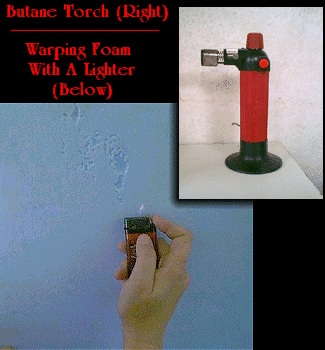
If you like the look (I do), run a lighter, candle or
butane VERY quickly over the whole tombstone to "warp" it. Try to run
the flame over the tombstone at a steep angle, instead of directly at
it. You're not trying to melt the foam as much as you are gently
warping the surface.
I purchased a butane torch from Walmart. It stands on its own and has
an electronic ignition. It's also good for lighting incense and
charcoal tablets.
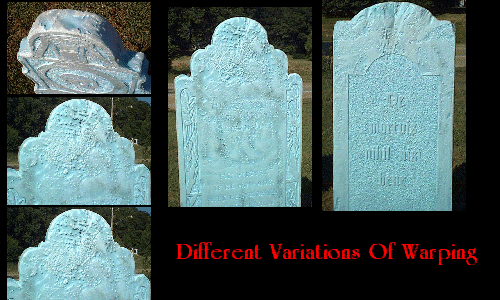
Here's a new trick I have been
using for about a year. Before you warp your stone as shown above, try
wetting it down with a garden hose first, then run your lighter or
butane over it quickly. Wet areas warp more slowly than dry areas. The
effect varies depending on several factors.
SANDING, ROUTING, MELTING: Sanding or routing foam opens the foam
cells, creating tiny open "cups" that fill with water. Therefore it
takes longer to warp that area. If you have used a woodburning tool or
already heat warped an area, the cells have closed (think cauterized).
Less water, quicker warping.
ANGLE: If the foam is lying flat, the water beads up and
creates more spotting. Angled or standing, it will create a more
streaked effect.
TIME: The amount of time between wetting and warping will
create different effects. Try waiting 60-90 seconds after wetting the
foam. Try warping immediately after wetting.
You'll have to experiment. Below are a few examples of the warping.
This is also a great excuse to play with your garden hose on a hot summer day.
Play with your garden hoses, my friends. Life's too short to be so mature.
All the tombstones are first
hand painted (I now use a Wagner paint sprayer) with a latex paint, I
use black or grey but if you have leftover house paint, use it! It's a
great way to use up leftover paint. If you need to purchase it, check
the "mistake" bin at the paint counter first. Seems like there's always
a grey someone didn't like. NOTE: Aerosol paint melts the bare foam.
Always base paint the tombstone first. Make SURE it's totally covered,
even a pinhole will let aerosol paint in and your foam will
disintegrate. From experience I can tell you this usually occurs in the
worst spot--the epitaph. I've lost entire phrases. I usually go over
all engraving carefully and hand paint any bare spots.
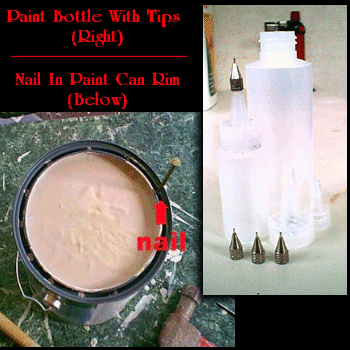
A quick side tip:
Hammer a nail into the drip trough (Rim) of your paint can. Excess
paint will drain back into the can and the lid won't stick so badly.
The "granite" tombstones are sprayed with a specialty spraypaint
called "Granite Stone". This spray paint comes out in different subtly
coloured "specks". It comes in different colours, mostly greys, beige,
brown, some blue or green
The engraved letters are painted in with a watered down
black or grey acrylic paint, just enough to highlight them and look
like natural dirt inside the lettering. In my most recent stones, I did
not do this. Some of the smaller lettered epitaphs did not show up as
well as I would have liked. An eyedropper and a small brush is a help.
Lately, I've been using a bottle and tip designed for fabric paints.
You can pick up one of these (they have sets with various sized bottles
and tips) at most craft stores. I found mine at Michael's.
The whole thing is then varnished or polyurethaned.
The "plain" tombstones are just base coated, then "aged" with spray paint, the letters filled in, varnished or polyurethaned.
The "marble" tombstones are, again, base painted with latex
paint. After dry, they are sprayed with another effect spray called
"Marbling Spray" or "Webbing Spray", which sprays out rather like
"Silly String". You can find this at craft stores like Michael's.
Varnish or polyurethane. (I have two black shiny ones which are painted
with black gloss paint, then "marbled" with silver webbing spray. They
look fabulous.)
After everything is done, I age my stones with a light misting of a
dark spraypaint. Stand a few steps away and let the paint drift over
the stones lightly and build up as you wish. On green granite
tombstones, I like to mist with a metallic copper spraypaint also.
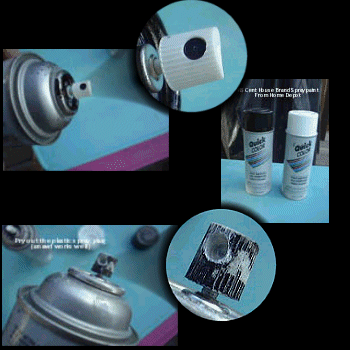
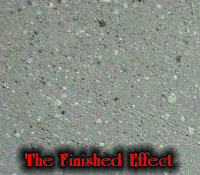
Bob Poniatowski sent me some pictures of a neat trick he uses to
create granite flecks using regular spraypaint, instead of an expensive
granite spray:
By taking the "Spray Plug" out of the spray paint nozzle, you will get a "splattered" effect
(See Pictures Below)
(Below Is the finished effect using regular spraypaint)
New Painting Technique!!!
Here is a nifty tip Jawbone posted to the list. This, combined with the
wetwarping technique and Bob Ponotowski's spray paint method, has been
a great new tip I'm enthralled with. The stones turn out a bit darker,
creepier and best of all ALOT cheaper--no more granite spray!
So simple, it's embarrassing.
Carve your basic tombstone and base paint it. Let dry thoroughly.
Put up your tombstone.
Wet the tombstone completely with your garden hose.
Spraypaint a section of the tombstone with black or dark grey spray paint.
Hose it off immediately.
Doesn't have to be a hard spray, just rain on it and let the paint run down in rivulets.
Doing it this summer, I found that I could spraypaint 1/3 to 1/2 the stone before spraying it with the hose.
Experiment, you'll see what I mean. It's only scary the first time.
I use 1/4" metal rods or dowels,
pounded into the ground, to hold the tombstones up. Please remember to
pound these into the ground FIRST,and slide the tombstone OVER them.
One year my husband became so engrossed in the look of the graveyard
that he inserted the metal rods and attempted to hammer the tombstone
itself into the ground. Needless to say, the rods tore through the foam
and shot out the top.
Please keep in mind that these are all just suggestions. Some I
learned in theatre tech years and years ago, there may be new and
better ways to do things. Some I made up as I went along, they are just
things that worked for me. Please feel free to adapt.